|
Using wide angle lenses to make objects larger than they appear
February 21, 2011 Photography
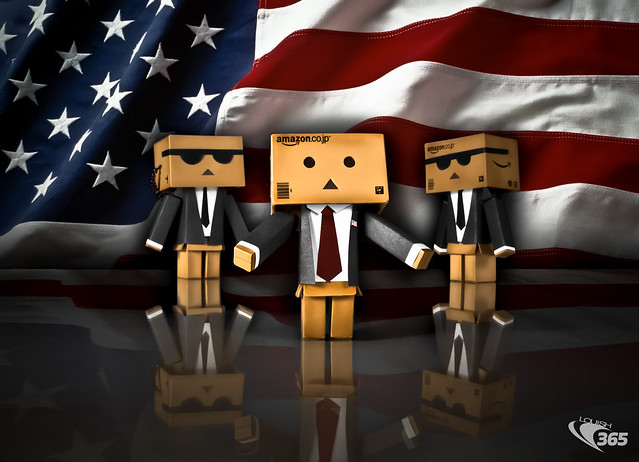
 Behind the scenes writeup of the photoshoot and editing and the Danboard Presidents Day photo. Behind the scenes writeup of the photoshoot and editing and the Danboard Presidents Day photo. | |
Blogged By:

Team Louish |
|
For Presidents day, I wanted to make an image with my Danboard dressed as the president. I grabbed some black construction paper (which is pretty handy to have on hand, by the way) and starting making my Danboards their presidential uniforms. I have three Danboards total, two large ones and one small one. Since I wanted one president and two secret service agents, I had to use the small one for the president. My setup looked like this:

I'm shooting it against a blue screen instead of a green screen because sometimes keying out Chroma doesn't always work as planned. With blue, at least I'm safe with a cool picture. And green isn't very patriotic, so that's why I used blue. You might be asking, why not stick an American flag in the background. Well if I had one, I would have. Sad, I know. Oh well, we'll add it in post. My first instinct was to grab my 100mm Macro lens, which would clearly give me the sharpest image for this photo. Since the president was so much smaller than the agents, I had to place him much closer to the camera to make him appear larger. That's fine, maybe a nice bokeh would look good.
 | The shot to the left was the first shot at f/2.8 (No lights, just the light in the room). Its taken with my 5D Mark II and 100mm f/2.8L Macro IS USM lens. The image came out great with a nice and blurry background, but I spent so much time on the secret service agents outfits (and even his ear piece) that I didn't want to all my effort to go to waste. So I tried another shot at f/32 just to see if I could get them all in focus. (Shooting all the way at the smallest aperture won't result in the best quality your lens can offer. I'm just doing test shots right now, to see if it will even work) |
Ok. This is the same setup, I didn't move anything, I just adjusted my camera to f/32 and turned on my speedlites. Recently, someone mentioned they didn't see me using a light meter in one of my tutorial videos. They asked how I made sure my lights were at the right exposure. I thought it was a great question cause there is a misconception going around that you need a light meter in order to use off camera lights. This is not true at all. When I started to learn about off camera lighting, I read the entire Lighting 101 / Lighting 102 workshops at Strobist.com. If you are interested in off camera lighting and haven't read that yet, go and read it now. I'll wait. (kidding, its like 50 pages, read it after you're done with this blog) The way David teaches in his workshops teaches you how to light without a meter. For one, just look at the back of your camera and see if the picture looks good. If its too bright, either turn down your lights or make your aperture smaller or lower your ISO. (but if you're using lights, I always start at my lowest ISO to begin with). The LCD screen on the back of your camera and your eyeballs is a great light meter, and its free, so use it :)
K, Back to the photo. f/32 definitely helps. If this was my final shot and I wanted all three guys in focus, I'd probably do a shot at f/8 focused on the danboard in front, and another shot at f/8 focused on the guys in back, then merge the two later in photoshop. I'd rather do a little photoshop work later and get a better quality image to pull it off at f/32.
The only problem is, the agents in the back and still too big. I was hoping that by putting the little guy closest to the camera would make him appear big enough to where the agents wouldn't be downing him out. I don't want to make it look like the president is a child. So, in order to get the objects closest to the camera to appear dramatically larger than items behind it, we need to use a wide angle lens. I have a 16-35mm, a 12-24mm, and a 15mm fisheye. I know I want the president to be as big as possible, so I tried the Sigma 12-24mm first. Here was the result. I had to move the camera 2 feet closer. If you look back at the setup of the shot, the camera is right next to the table. This is where I took the shot for the final image. For the images above using the 100mm lens, the camera was 2 feet farther back than shown in the setup image at the top. For the 100mm photos, the little danboard in front is exactly 3 feet away from the from of the 100mm lens. With the wide angle lenses, the danboard in front is 10 inches away from the lens.
I definitely like the way the photo is coming out with the wide angle lens. At least now, the little danboard is the same size, if not larger than the guys in back. I ended up switching to the 15mm fisheye, because it takes sharper images when taking photos of stuff up close. And since I was going to be cropping the photo anyways, it doesn't matter that it was a fisheye. In fact, in Adobe Lightroom, it's as easy as a click of a button to de-warp a fisheye image. (though I didn't de-wrap my image since it was in the center of the shot and I cropped it). If I were to de-warp the fisheye image, it would look almost identical to the 12mm image above. Here was the final raw image with the Canon 15mm Fisheye lens. From here, I brought everything into Lightroom, did a few edits. Exported the file and removed the blue using Adobe After Effects. (I did a write up and video on how to remove green screen using Adobe After Effects.) Once I had the transparent image, I brought the image back into photoshop and added the background, added some shadows, fixed the colors, and removed some spots. Then I brought the image back into Lightroom where I did some more adjustments. Raised the clarity, added vignetting, adjusted some more colors, and I was done. Here is the final photo.

Other Tutorial Photos
Other Behind The Scenes Photos
Other Danboard Photos
Related Articles
COMMENTS
 |
21 February 2011 - 13:24:53 -
Oshynlover
The writeups are awesome! SO helpful Thank you for taking the time to do them!!!
|
|


