Easy and Perfect Green Screen removal for still photography.
September 19, 2010 Photography Tutorials
This is a step by step instruction tutorial for green screen removal for still photography using Adobe After Effects.
Blogged By: Team Louish
Easy Green Screen Removal for Photography
Setting up the green screen
When setting up your green screen, try to light the background separately from your subject. I used three 300 watt variable studio lights purchasing from eBay in an entire kit for only a couple hundred dollars. These eBay lights are lightweight, cheap, and they work great. I will probably one day buy some Alien Bee studio lights, only because I use RadioPopper JrX's and with the JrX transmitter, I can control the strobe power output directly from the camera if I had Alien Bees. I already have the ability to control the light group output with my Canon Speedlites, but when I'm doing things indoors, I prefer to use the studio lights so I don't have to keep switching out the batteries. I used two studio lights for the background with umbrellas that have black covers on the back to prevent overspill from your lights.
Make sure the lights are evenly spaced both on the left and right of the background so your background is as evenly lit at possible. Put your camera at your desired ISO (I usually keep it between 100 - 400 ISO). Set the shutter speed to your fastest synch speed (My camera is about 1/200 sec when I'm not using High Speed Sync). Set your background strobes at half power and take a test shot.
If it's too bright, close your aperture to let in less light. (closing the aperture would be the same as making the F-stop a larger number, for example, going from f/5.6 to f11). If your background is too dark, open your aperture to let in more light. If you're already at your cameras aperture limit (open all the way or closed all the way), then you can adjust your lights up or down to fix the light. You can also increase your ISO between 400-800, that will defiantly make your picture brighter. I like to keep my ISO as low as my camera can handle for higher quality. But I'm sure you won't notice a difference going from 100 to 400) I usually tell people to try adjusting their camera since some people don't have variable lights. Sometimes, lights purchased on eBay has only 1 power setting. In this case, your only option would be to adjust camera settings.
Taking the photo
Once your background is properly exposed, go ahead and take a photo of someone standing in front of your background lights. They should be dark since we haven't setup their lights yet. (figure 2)
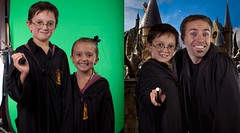
Now, turn on your foreground / subject lights and adjust using the power on the light and/or moving the lights closer / farther from your subject. Take some test shots in between each adjustment so you can see the changes. When your lights are correct, it should look like figure 3. If your new background has special lighting in it, try to match the lights in your new background image so it looks more real.
Removing the Green Screen in Adobe After Effects
Once you have your photo, it's time to bring it into Adobe After Effects. When you create your new project, a composition settings window will appear. (figure 4) Make sure the checkbox next to "Lock Aspect Ratio" is unchecked. Then set your width and height to the same width and height of your photo. Make sure "Square Pixels" is selected. Choose 1 Frame per second. Choose a duration of 1:00 second.
Drag (or import) your photo into the Project Window on the top left. Then drag the photo from the project window to the composition window. In the Effects & Presets window (usually on the right), search for the effect called Keylight 1.2 (it comes with Adobe After Effects). Drag Keylight on top of your photo. The keylight settings will appear on the left. Choose the Eye Dropper next to Screen Colour. Click the color on your photo that you want to remove. Choose a color close to the subjects body. In After Effects CS4, you can export your transparent png by choosing File / Export / Image Sequence, choose PNG, specify 1 frame a second. (Make sure your work area is only 1 second). In After Effects CS5, its totally different now. They made a Render Queue. Click Composition at the top, choose "Add to Render Queue". At the bottom where the composition timeline was, it will now show render settings. Where it says "Output Module", click the Orange link that says "Lossless". In the new Window, choose Format "PNG Sequence". In the Video Output section, under Channels, choose RGB + Alpha. (Figure 5)
You might need to specify the "Output To" setting as well. Just specify the file location where you want the PNG to be saved. Click the "Render" button on the top right of this Render Queue panel. It should take anywhere from 5 seconds to 45 seconds depending on your computer speed and image size.
Adding the new background
Once you have your photo with a transparent background, open your new background and transparent image in your favorite photo editing program. I use Paint Shop Pro for all my web development work since its light weight, doesn't use many resources (so you can install it on old slow computers too), and it does all the essential tasks. The only time I really use Photoshop is for their advanced skin touchup tools and the Liquify feature. Other than that, I use Paint Shop Pro (7.04) for everything. Grab the lasso tool and trace closely around your subject. Since we already removed the green, you don't have to trace perfectly. This set is only to remove the items that didn't get removed by the green screen. Make sure not to select your background items like the edge of the green screen or light stands, etc. I usually feather my selection about 40 - 200 pixels, depending on how large my photo is. If your background has wrinkles in it, those wrinkles will still appear. So this lasso step would be more important for you cause you will be lassoing your subject as close as possible without selecting the wrinkles in your background. If you have a lot of wrinkles, make sure you use a decent size feather size so it's not as obvious. Copy your new selection as a new layer on your new background image. You might need to resize the layer so the image looks proportionate. That's it. Save the image and you're done. In some cases, your lights may be a different color temperature than your background image. In this case, I would bring my original photo (before I removed the green screen) into a program like Adobe Lightroom and I would do all my color adjustments there first (White balance, etc).
Easy and Perfect Green Screen removal for still photography.This is a step by step instruction tutorial for green screen removal for still photography using Adobe After Effects.
COMMENTS
19 September 2010 - 19:41:10 -
Assassinator
Awesome walk through, thanks! I loved your Water Drop Splash photography tutorial too.
20 September 2010 - 8:56:50 -
jano23
Just watched your Green Screen removal video and was wondering if you could supply a little more detail on the Ebay lights you purchased.
Thanks for a great tutorial.
After Effects ... who would have thunk it!
If you search on ebay for "strobe studio" you will find a bunch of kits.
I HIGHLY recommend you only look for strobes/lights that are variable (meaning, you can increase and decrease the brightness of the light with a dial on the back of the strobe). Don't get the ones that look like lightbulbs plugged into a socket. Get the ones that look bigger and have controls on the back of it (modeling light, removable plug, variable dial, etc). Get something where the lights are about 250w - 300w each. I feel the 180w lights are not powerful enough. Keep in mind, when they post an ebay listing, they usually put in the title the total watts. So make sure each light is at least 250w or 300w. I have the 300w ones.
Some auctions have backgrounds and background stands included with them, some don't. I prefer umbrellas over softboxes. I have 4 lights cause I often do green screen or seemless white and need 2 lights for the background and 2 more for the subject. If you aren't doing either of those, then 3 lights is enough. If the kit only contains 3 lights, you can always purchase 1 more light by itself in another auction. Thats what I did. I bought an entire kit, but I usually don't use the items that came in the kit. So it might of been cheaper to just buy everything separate. If you search for "strobe studio 300w", you'll find the lights by themselves are $89. If you get 4 of those, it only comes out to $236. Umbrellas are cheap, you can get them as cheap as $10 ea from BHphoto.com, and lightstands are only $20 each from bhphoto.com as well (Impact Light Stand - Black, 6' ). The lights from ebay usually include shipping. The umbrellas and lightstands from BHphoto.com will cost extra. Just make sure you price everything out, including shipping, to see whats your best bet.
@Sarah - Photoshop does not have a green screen removal technique like shown in this example. There are other methods, such as cutting the person out with the lasso, but they aren't as clean and easy as this method. There are also third party companies that make plugins that work with photoshop. I use AfterEffects cause I already have it. I have seen another company called Topaz that makes a product called ReMask that seemed like it had some nice results, but the tutorials I've seen of their software did not seem as easy as 1 click.