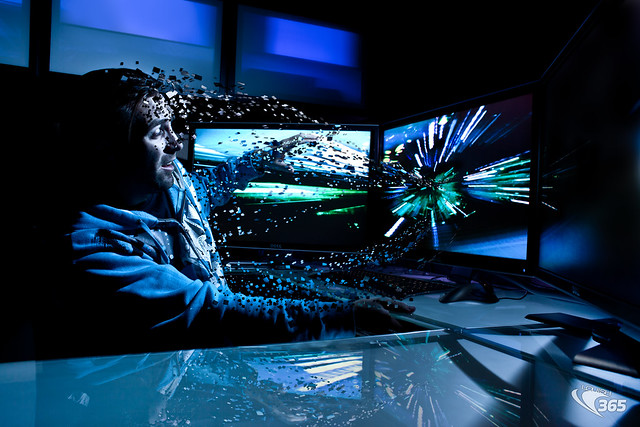
Photo Spotlight Warp Speed Dissolving into Monitors 22/365January 22, 2011 Portfolio
Day 22 of Project 365 A picture of me dissolving into my three 30" monitors at Warp Speed Strobist Info: One Canon 580ex II speedlite under my desk near my feet facing up at the glass bare with a blue gel at 1/2 power. One Canon 430ex II speedlite above the right monitor facing me directly, with a blue gel at 1/2 power. Triggered with RadioPopper JrX I had to do a full 1 second shutter speed to absorb the ambient glow of the monitors and my glass cupboards above my desk. Canon EOS 5D Mark II with a Canon EF 28mm f/1.8 USM Wide Angle Lens at f/6.3, manual focus set to my jacket. ISO 100. Post processing done in Lightroom 3 and Photoshop CS5. Believe it or not, I'm not "really" dissolving into my monitors. :) hehe One thing I didn't realize when shooting the image was my reflection in the desk... since its a true reflection, I couldn't just copy my photoshop work and flip it over. I actually had to re-edit, in the exact same steps, for the bottom portion. Fun stuff. Here is a VERY QUICK run down on how to make an image like this: Make sure you starting images are good. Your final photo will only be as good as the photo you started with. This technique is only to help with the squares. I am going to start doing more video tutorials on how to do photos like this, and other stuff too, so keep checking back to see when I start uploading more tutorials. Take 2 photos, one without you in the photo, another with you in the photo. You want to take 2 photos so its easier to cut pieces out and have the correct background appear. Put the image without you in it lower than the image with you in it. Then, with a square brush in Photoshop (if you don't have a square brush, make one), you can (on a new layer) paint black squares (with size and jitter and angle turned on so as u draw, each square is different). Use this brush to draw over your face and arms. Make a selection of this layer (ctrl click the layer thumbnail). Then, now that you have the selection of squares overlapping your face and arms, switch back to the layer with your body on it. and right click your selection and choose "Layer from Cut" (or just cut the selection out of your face and paste it as a new layer). From here, you should have the squares over your face as a new layer. If you move the layer you should see the bottom layer showing through your image with you in it with square missing. Make sure the layer with the squares is on (the cut squares, not the black ones), then Warp the layer.. you can stretch the layer around and make it look like the squares are leaving your body by warping the layer. From there, just make another layer and make another brush but select 2 colors from your photo and make sure the brush has "Color Dynamics" enabled so your brush is drawing different colored squares as you paint. If you have a tablet with a pressure sensitive pen, its easier cause as you paint with your pen, you can change the size of the square based on pen pressure. If you dont have a drawing tablet, then you will just have to adjust the size of the brush as you draw. Once you draw a bunch of square, apply another warp to the new layer of square to help move them around a little, and maybe make it so the warp looks like its sucking into something, like in my case, was the monitor. COMMENTS |