Photo Spotlight Mountain Dew Wall 8/365January 8, 2011 Portfolio
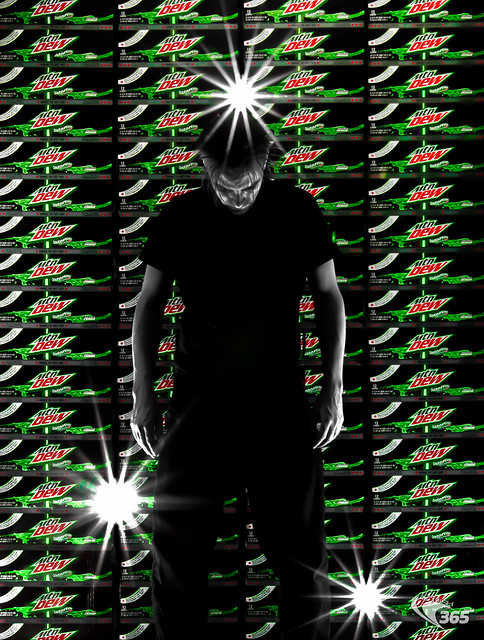
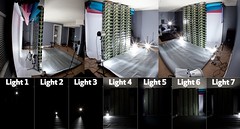
Day 8 of Project 365 Mountain Dew Wall (Not photoshopped, real lights, real mountain dew) 7 Lights. About the photo I had this idea ever since I bought my latest pallet of Mtn Dew. Sure, it could be created in photoshop much quicker, but hey, I wanted to see if I could do it without photoshop. I wanted to make a wall of Mtn Dew, but somehow put 1/4" space between each 12 pack so the light would come through. So, my first attempt at this photo was to purchase about 4 pieces of flat molding/trim at home depot, cut them into 4" strips, and then put 2 pieces of trim on each case of mountain dew so it would have a small gap between each case. Once I got to four cases in height, the wall was very unstable and was ready to fall over. This wasn't going to work at all, since I needed to go 18 cases high. So before it fell over, I stuck a few lights behind my short wall of dew and took a picture. Hmmm... I didn't like it... I had when I have this idea in my head and when I put it together, it doesn't work. My idea was that light would be beaming in between every single case giving this amazing glow. But to do this, I would need... well I don't know what I would need cause it didn't work. So before the wall fell over, I took it all down. Back to square one. One hour lost. So I built the wall again, but this time I turned the cases on the side so the cans were standing up. This would help a lot with the stability. The only down side was this was the uglier side of the case, the part with the perforated edge for the handle, so 1/2 the cases has the handle already punched out. The other side of the case had the barcode on it. So I decided I'd rather Photoshop a few missing handles back in the photo than remove all the ugly barcodes. I built the wall, 18 cases tall, and it was 2 inches short of hitting the ceiling. I stuck a bunch of pieces of cardboard in between the top case and the ceiling to give it some stability. The last tower (of 4) wouldn't stay up on its own, and I was out of cardboard, and building this wall all by myself. This was difficult. And I'm sure it was dangerous too, but I was more worried about losing the dew and damaging my photo floor than my safety :) So here I am, balancing on a poorly made ikea chair that's about to fall apart, holding this last tower of Mtn Dew up that was about to fall, trying to figure out what I could cram between the dew and the ceiling to keep it balanced. I could reach a roll of tape, barely, so I grabbed that and taped it to the ceiling. Once it was a little more secure, I taped it some more to the paper roller behind it. I guess the point is, don't try this at home, cause it was a pain in the you know what. (and all for a "photo of the day"). Once the wall was built, I started adding lights one at a time until I got the effect I was going for. Three lights behind the tower shining through the cracks. My camera is set to the smallest aperture to make the lights get the sunburst effect. I had to keep adjusting the lights until the camera could see each bare bulb shining. I used Canon Speedlites behind the wall triggered with RadioPoppers. Ok.. now my wall has 3 lights shining through it. Now I need to light the front of the cases. So I stuck two more lights on each side, bare lights, no modifiers since I didn't want the light to spill on me, which I wanted to be dark. Once the wall was lit a little, I took some pictures with me in front. I needed more definition, so I added 2 more lights as rim lights to help separate me from the wall. And done. I think I took like 3 pictures once I added the last lights, grabbed the memory card, and went upstairs to start editing. Behind the Scenes My favorite part about todays photo is the behind the scenes photos. I took some pictures of the setup since this photo took 7 lights to complete. I thought it would be interesting to take one photo with each light on all by itself so you could see what each light was doing to the photo. As a result of taking these photos with 1 light on, I realized, you can put each image in a separate layer in Photoshop, change the blending mode to Lighten, and you magically have a dynamic lighting studio! Once I made this Photoshop file with each light on a separate layer, you can toggle on and off each layer to see how each image contributes to the final photo. With all the layers turned on, the photo looks close to the final result (without me in it). It's really quite fun to play with. So I am providing you with the PSD Photoshop file for you to download and play with yourself. The file is here: www.louish.com/tutorials/Mtn_Dew_Wall_Lights_On_Off.psd More photos from this shoot
COMMENTS |